Robotics Projects: Navigation, Mapping, Control, Deep RL and others
My “home service” robot just finished dropping off the square marker and stopped in final position that was set as its second goal and executed by move_base ROS package that in turn uses the underlying navigation stack with global and local planners to build plan and eventually send commands to the controller that drives robot in simulation on Gazebo. That was the last requirement for the final project. I’ve tested it a bit more, prepared the archive with all ROS packages that contained custom nodes, configurations, scripts, launch files and send for the review.
I’ve just finished a great journey through Robotics Software Engineer Nanodegree program at Udacity as a part of the first cohort where we’ve deep dived into how a robot works and how to write software for them. There were a vast amount of materials to learn and tinkering from custom build simulations and python APIs to control robots or tuning PID controllers to deep reinforcement learning agents that run on Jetson TX2 and control simulated robotics arm.
During the program, there were 9 projects, and here I briefly describe them with the results, personal reflections and links to the related materials so you can use it to learn more about the field.
Note: Each project description contains GitHub links to solution code and project write-up that addresses questions needed for the submission. If you are current Udacity student in the program, I would highly recommend you build your solution first before looking inside.
Project 1.1: Search and Sample Return
The project based on NASA Sample Return Competition which is a great way to introduce to the field and show how it can be applied in the real settings. NASA’s competition involves building autonomous rovers with a capability to locate and retrieve rock samples and return those samples to a designated zone in a specified amount of time with limited mapping data.
In contrast to NASA’s competition, we don’t need to build a robot, and our objective is to control robot simulation through Python API and build a simple map of the environment, locate rock samples, and retrieve them. The simulator is built on Unity and provides an easy to use the environment to test perception and control algorithms.
To complete the objective one need to build perception and decision pipelines. During the perception stage camera image cropped, transformed to the bird-eye view and through the series of thresholds walls, grounds and diamonds are located and marked on maps with different colors.
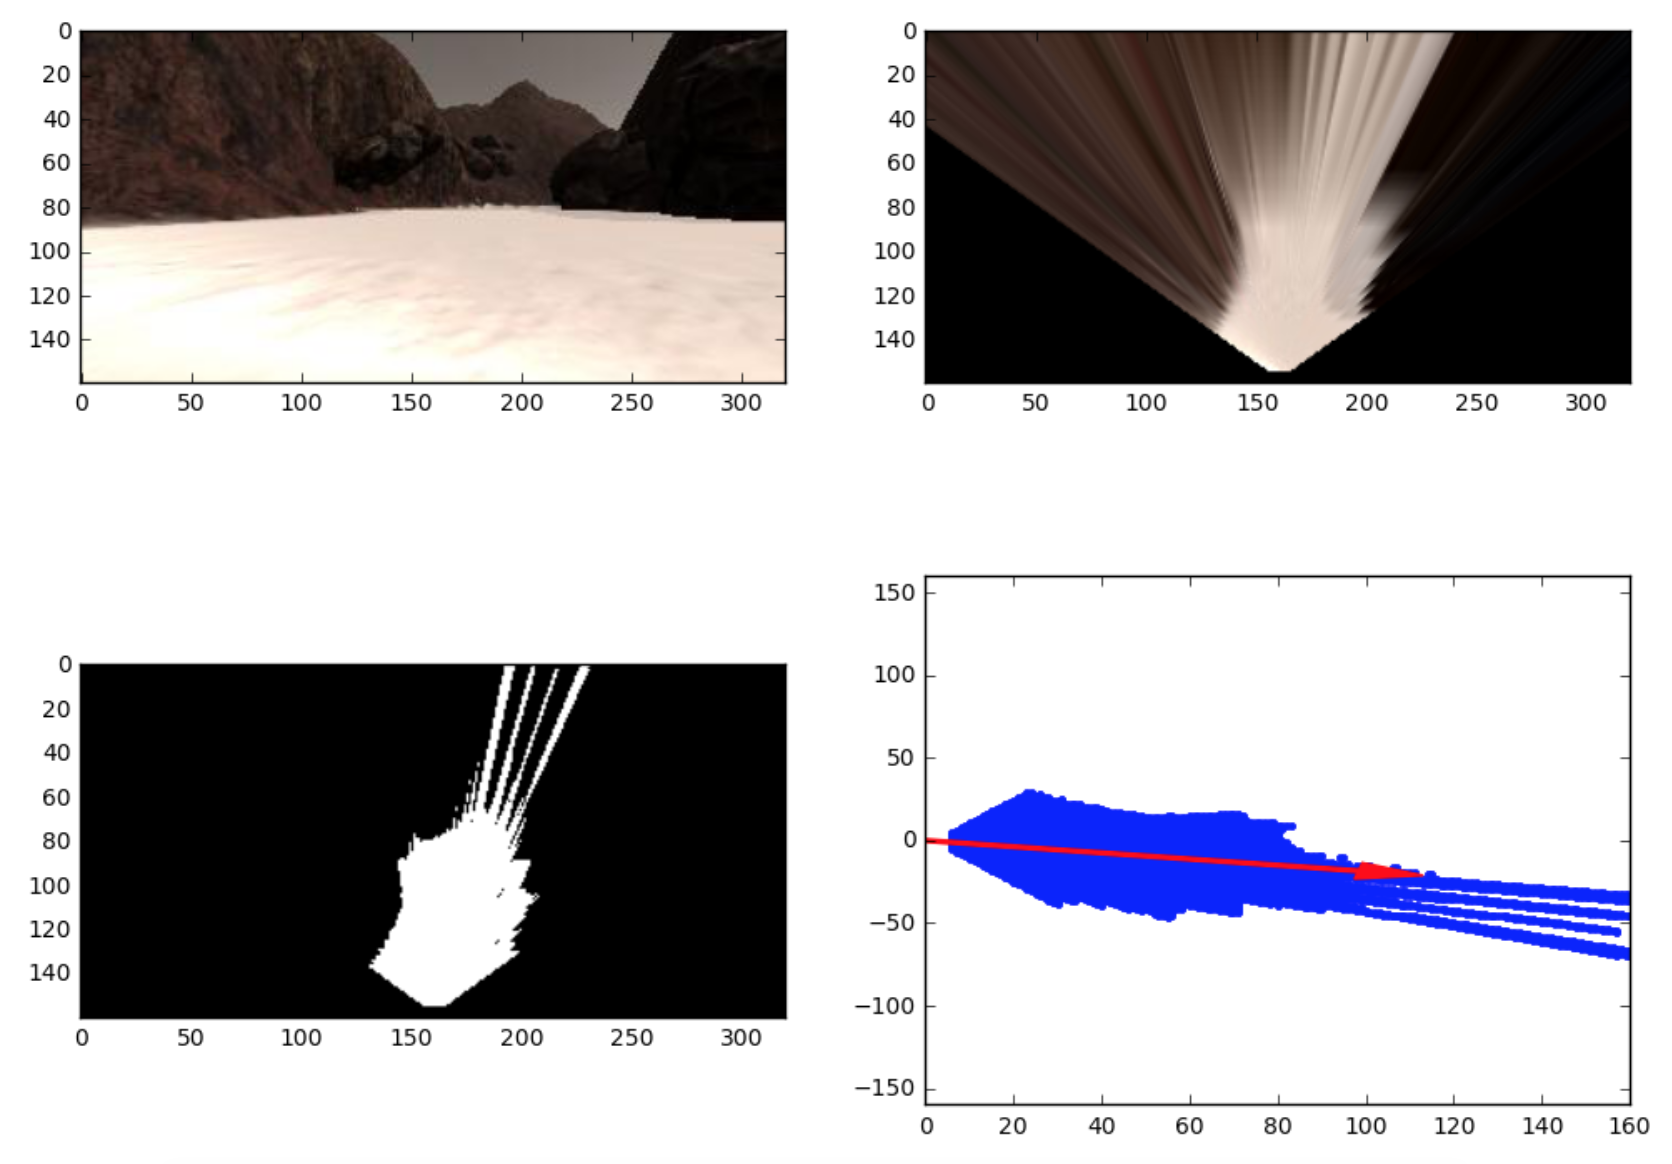 Free space detection pipeline
The decision step is either move forward to the free area and lean a bit to the direction of the wall (follow_wall mode) or forward_stop when rock sample is detected or rotate_right if rover stuck and not moving. Simple perception algorithm can’t detect holes or flying rocks that can trap our rover, so current speed is continuously monitored and switch to the rotate_right mode happens when the robot is stuck.
I’ve spent lot’s of time on things that weren’t needed in the project — like trying to build an accurate map and guide robot using A* path planner or tuning separate speed and yaw PID controllers for control step. However, eventually, I’ve returned to the simplest solution with wall follower algorithm and decision step based on a number of pixels of the free space and diamonds.
Here is the resulting rover in action. Not so smooth and sometimes acts roughly and jerky.
There are many things one could try to improve upon current implementation:
- better PID controllers (PID tunning is always hard)
- more tweaks to thresholds params, especially for diamonds
- safe stop before walls
- continuity in plans and way to remove diamonds flickering
You can play yourself with the starter project and clone it from RoboND-Rover-Project GitHub links where to download the simulator you find in README file.
My project GitHub and writeup links.
Related links:
Project 1.2: Robotic Arm: Pick & Place
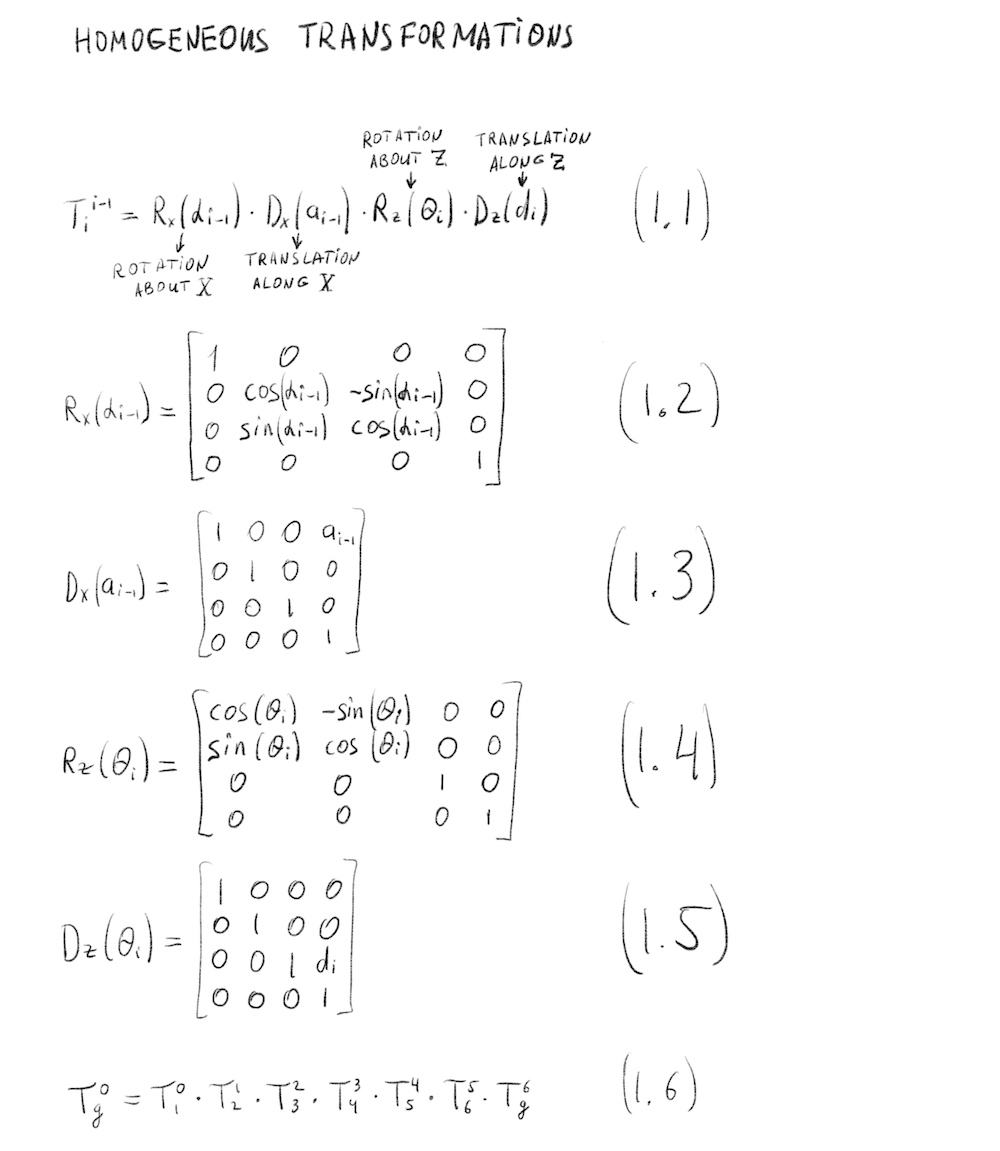
Here are the hardware basics of robotics - modeling robot description and defining its Denavit-Hartenberg (DH) parameters and calculate forward kinematics matrix and inverse kinematics solutions for the robotics arm Kuka KR210, and test it all in ROS with Gazebo.
Together with math and geometry you should also catch-up with ROS, Gazebo, RViz, MoveIt! and how to deploy everything on local Linux machine. Though it was possible to run everything within a virtual machine with all pre-installed software using Udacity provided image I’ve installed everything manually on a dedicated PC with an NVidia GPU 1080Ti. Which was the right decision because 13-inch MacBook Pro just wasn’t performant enough to run VM simulation with Linux and Gazebo faster than 0.1-0.2x from real-time.
I like math, so it was a great chance to remember trigonometry, so I’ve done all calculations by hand with iPad and Pencil. Below is the solution for DH table and forward kinematics that calculates the position of the end-effector given angles of all joints.
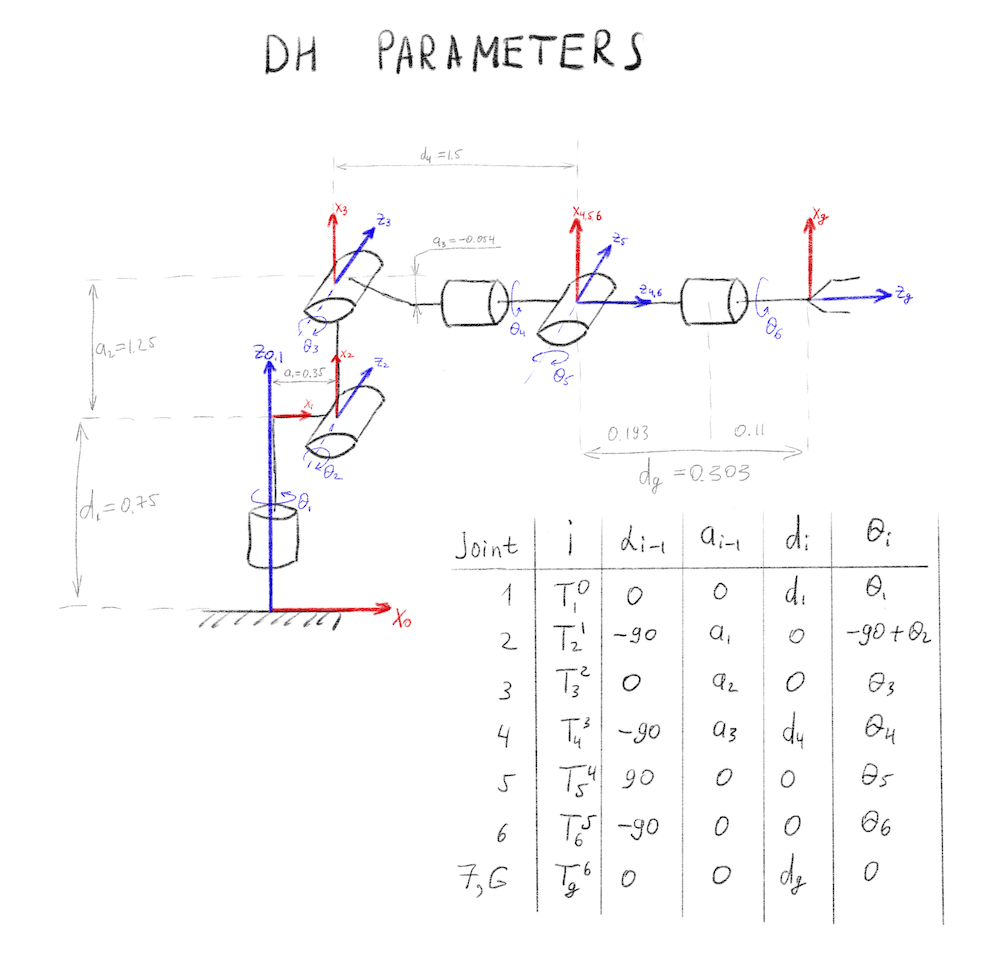 Modified DH parameters for Kuka KR210 Robotics Arm.
 Forward Kinematics transform for Kuka KR210 Robotics Arm.
The whole derivation of forward and inverse kinematics with correction transforms and special cases of singularity you can find in my project write-up.
One might ask “Why do we need to bother with this math when ROS can give provide you all transformations through tf package?” I think it’s important to understand it all because:
- ROS is not everywhere, and some systems can’t use it because of real-time requirements or sensitive applications
- There always new platforms and environments appearing so you sometimes need to write your implementation of things like linear algebra functions, forward and inverse kinematics calculations and SLAM algorithms (for example new ASICs or custom FPGA chips)
I would also prefer to learn more about dynamics and mechanical parts, but it seems a vast topic and Udacity would probably need to launch a separate Robotics Hardware Nanodegree to cover it in a meaningful way.
Here is the links to my implementation of the project on GitHub and a write-up.
Related links & materials:
- Introduction to Robotics, Lectures 1-5 (CS223A) in the Stanford Computer Science Department by Professor Oussama Khatib
- Khatamian, A. (2015, January). Solving Kinematics Problems of a 6-DOF Robot Manipulator.
- Robot Dynamics and Control, by MW Spong
Project 1.3: 3D Perception
What I like about Udacity’s course materials that they expose you to the real world problems and ongoing challenges in the robotics field.
Thus, the third project based on Amazon Robotics Challenge where the goal is to build a recognition pipeline for the set of known objects using RGB-D sensor data and send the correct pose for the robot to perform a pick-and-place operation.

Though that’s not enough for the participants because the full task for Amazon Robotics Challenge is to build an autonomous manipulator that can perform perception, motion planning, 3D mapping, kinematics and more to locate specific objects in cluttered dynamic environment retrieve and place them into a designated bin.
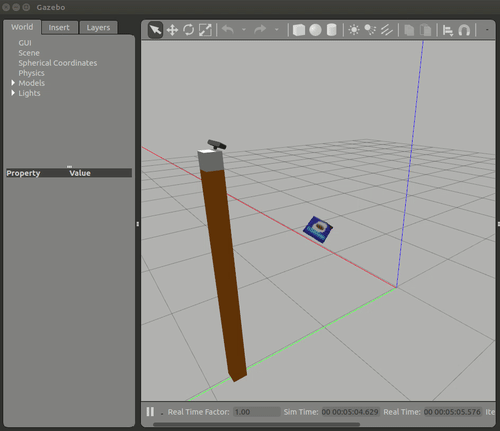
To train the model we need to collect point cloud data for each object in different orientations. Here is how Gazebo environment used for data collection by sequentially showing every object in random poses to the sensor and record HOG and surface normal feature vector.
It was excellent learning for me that with a quite simple 3D point cloud pipeline that goes through voxel downsampling, passthrough thresholding, RANSAC plane segmentation and Euclidean clustering we can separate individual points for objects on the table and apply SVM classifier to recognize them. Everything seems much complex in 3D than in 2D but this pipeline was clean, simple and produced great results (96% accuracy rate for SVM classifier).
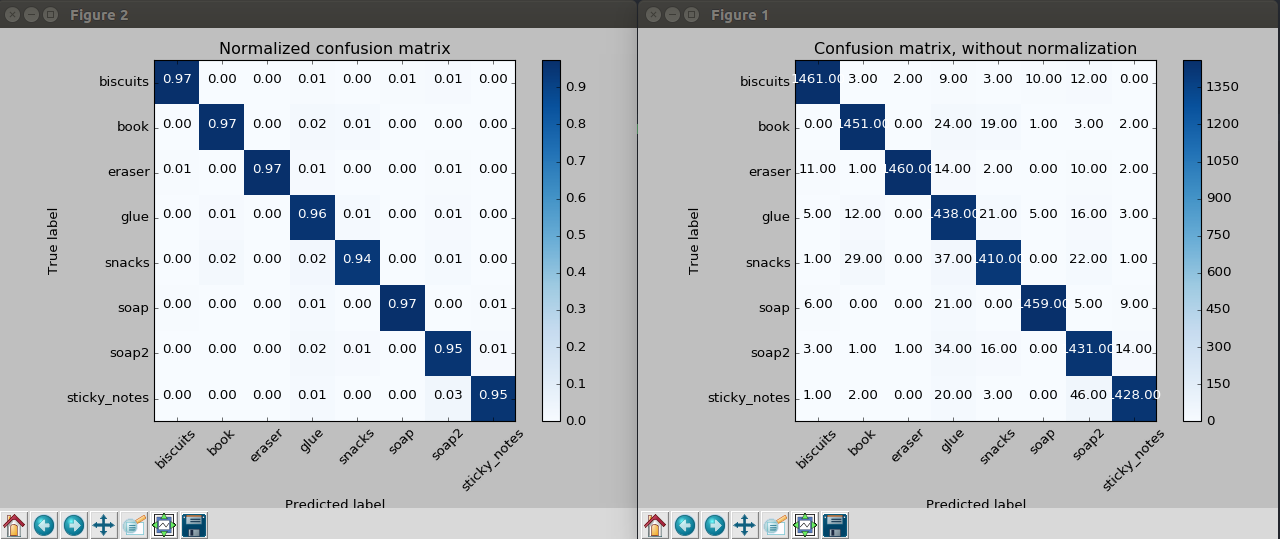 Confusion matrix for SVM Classifier
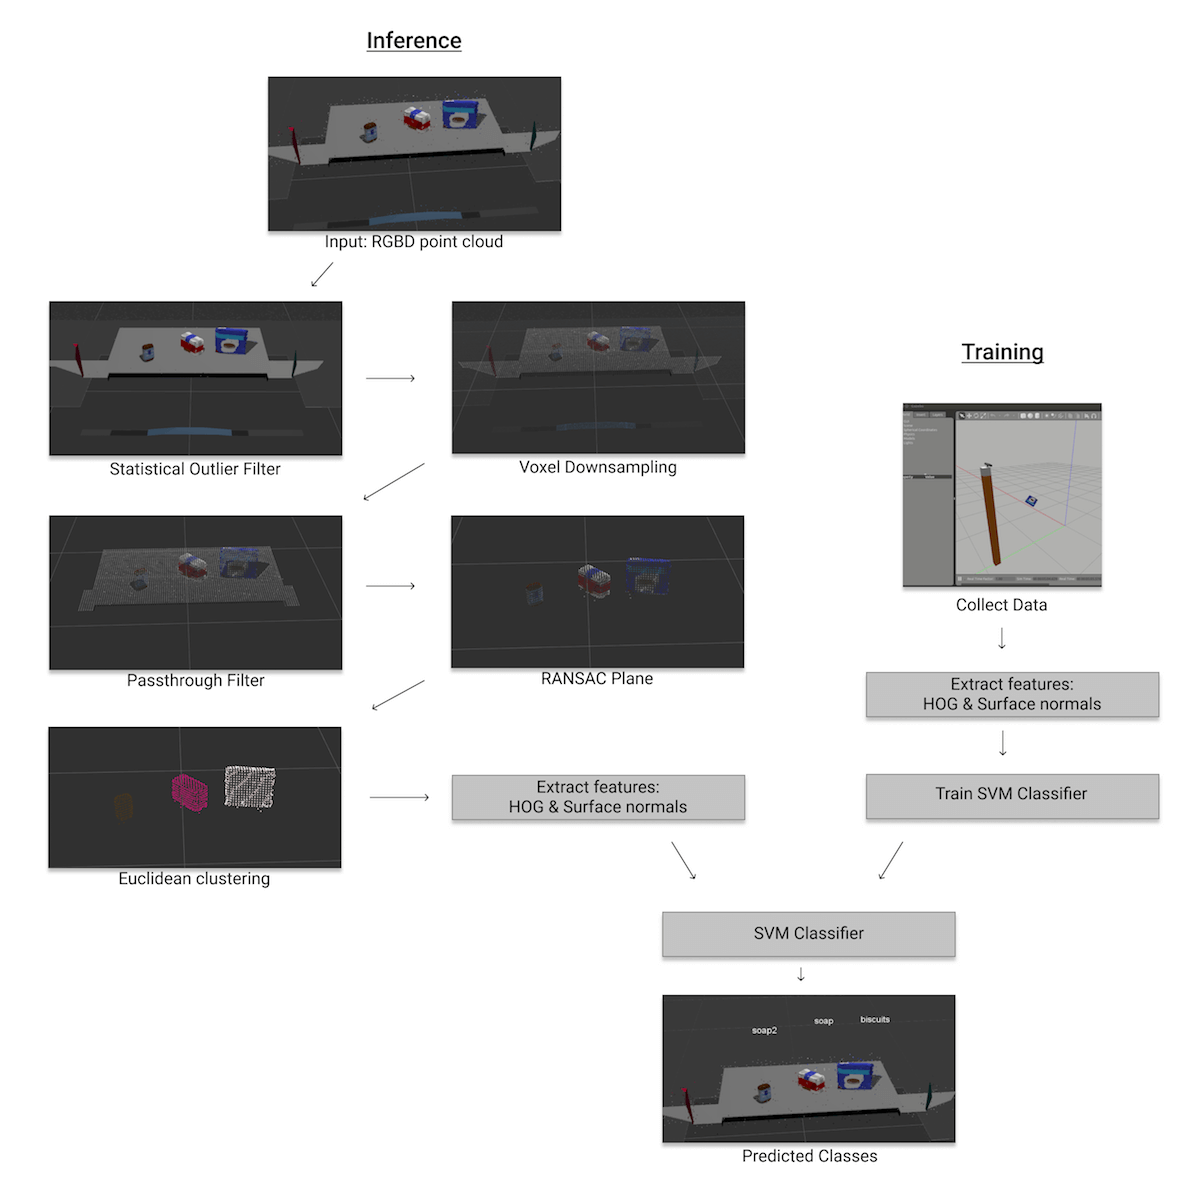 3D Perception pipeline: HOG & Surface normals features + SVM Classifier
Look at my implementation of the project on GitHub and a write-up link.
Related links & materials:
- MIT-Princeton at the Amazon Robotics Challenge, Winner 2017
- Mahler, Jeffrey, et al. “Dex-net 2.0: Deep learning to plan robust grasps with synthetic point clouds and analytic grasp metrics.”(2017).
- Zhou, Yin, and Oncel Tuzel. “VoxelNet: End-to-End Learning for Point Cloud Based 3D Object Detection.” (2017).
- CVPR 2017: Tutorial : 3D Deep Learning
Project 1.4 Follow Me
Well, that’s nice. If you are following drone industry updates, you probably know a couple of cases when drone companies claimed to build “follow me” feature and that drone be able to automatically fly beside you, take beautiful shots and avoid obstacles. Then they didn’t quite deliver on the promise because the task is just hard.
In this project, we’ve had a chance to build a part of this pipeline: person recognition through deep learning image segmentation and feed the data back to the drone simulator to test the following feature.
Udacity’s simulator is built on Unity game engine, and it’s an excellent tool as a playground for testing perception and control algorithms.
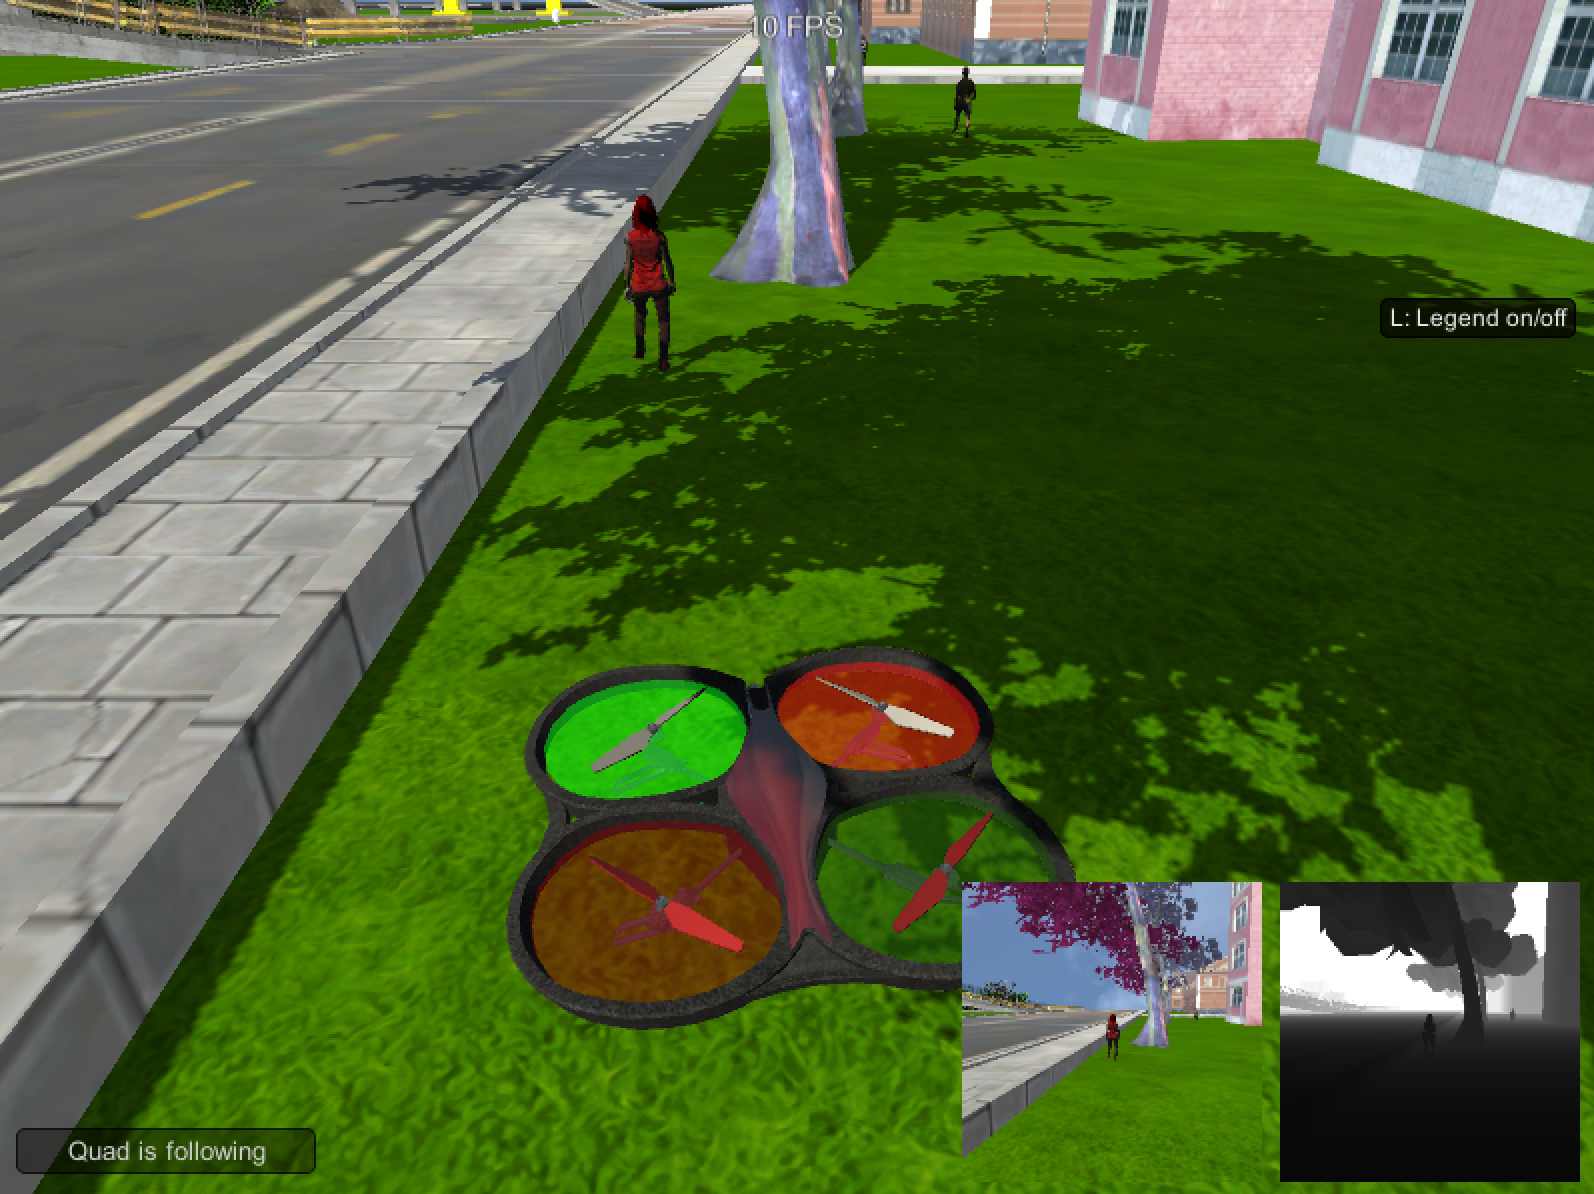 Udacity’s Drone Simulator
Image segmentation was build on Fully Connected Network (FCN) architecture that consists of convolutional encoder & decoder. It’s the first architecture that you can start from and test other approaches like Mask R-CNN, for example.
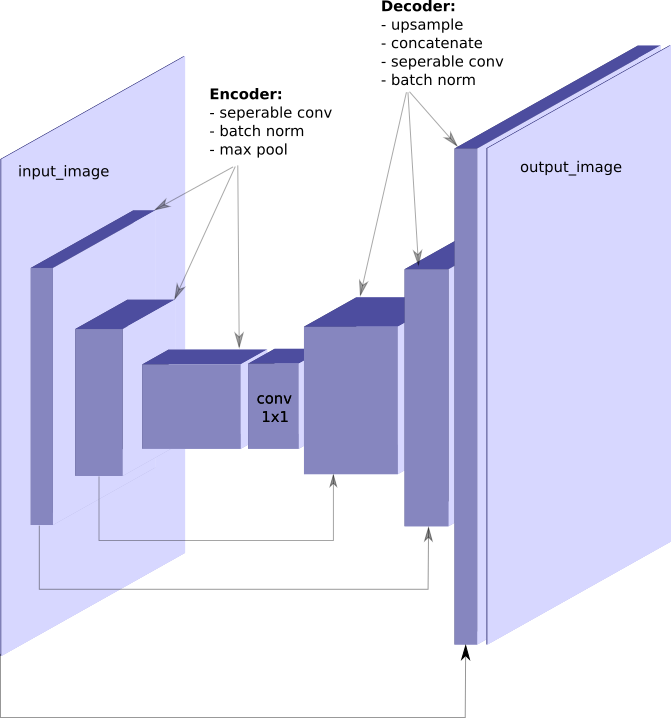 Simple FCN architecture for image segmentation task
For the hero segmentation task with such an FCN I was able to get average IoU score 89.6%.
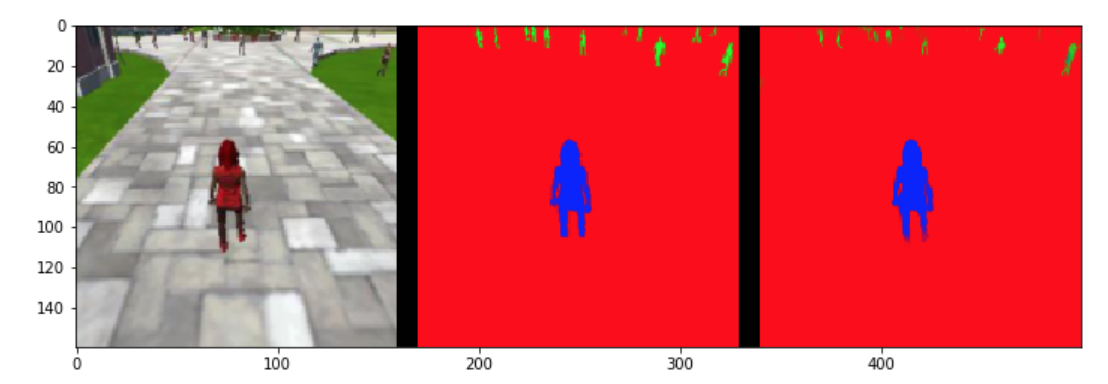 Hero segmentation: Original image, Ground Truth, Segmentation Result
Here are links to my implementation of the project on GitHub and a write-up.
Related links & materials:
- Long, J., Shelhamer, E., & Darrell, T. (2015). Fully convolutional networks for semantic segmentation.
- Image Segmentation
- Pohlen, Tobias, et al. “Full-resolution residual networks for semantic segmentation in street scenes.”(2017).
- He, Kaiming, et al. “Mask r-cnn.”, 2017
Project 2.1: Robotic Inference
In the first project of Term 2 we’ve explored the NVidia DIGITS system for training deep learning models for image classifications.
My choice was to build a model that can classify finger gestures so I can use it later for my home robots projects.
Data was collected manually using a camera on MacBook Pro.
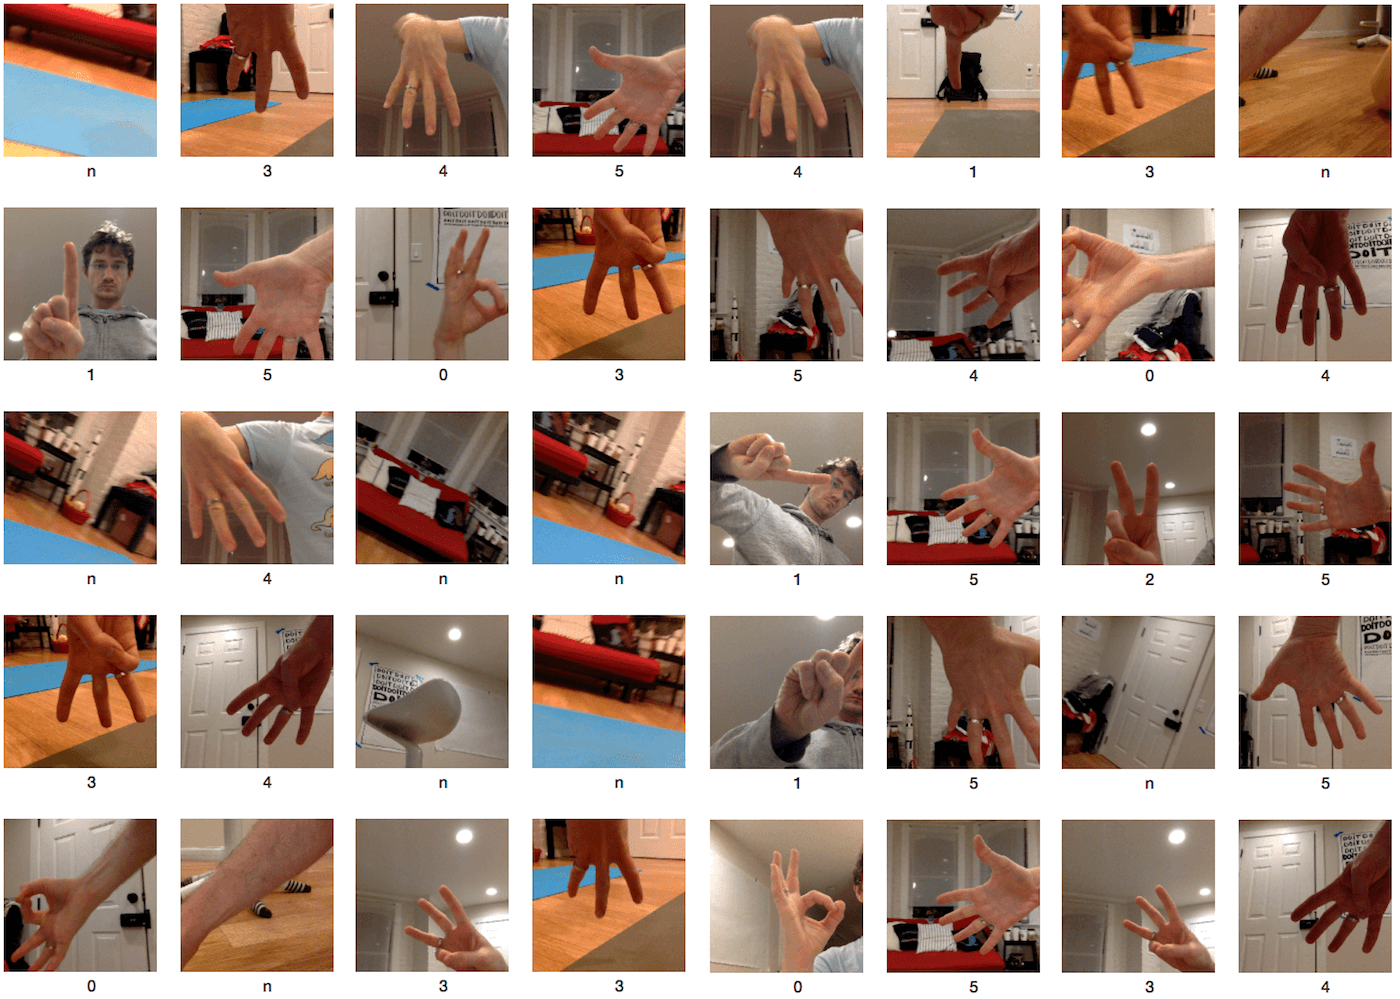 Fingers Classification: Example dataset
Interestingly enough that LeNet was able to train and recognize fingers gesture with high accuracy and as a result the inference performance on Tesla K80 GPU was 0.19 ms!
Details about the project and my implementation you can find in a previous article “Fingers Classification” and the source code of supporting tools on GitHub.
Related links:
Project 2.2: Where Am I?
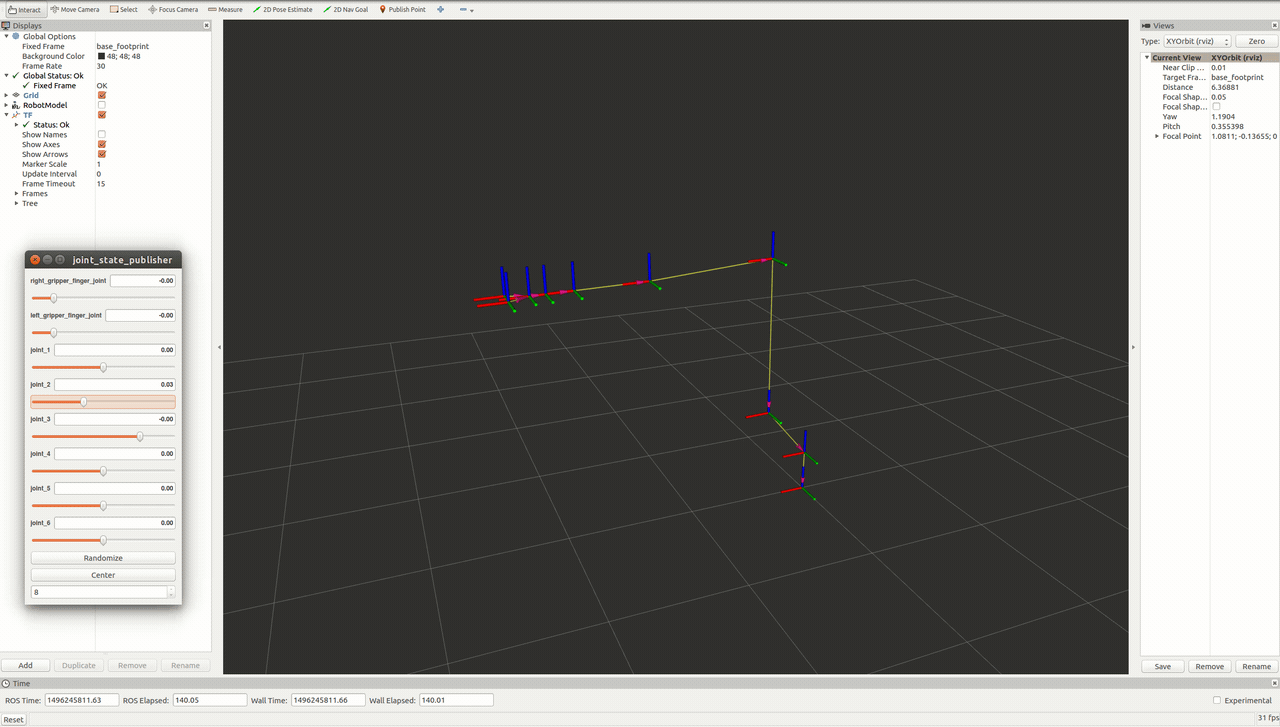
Here we are going deeper into a robot description and exploring Monte-Carlo Localization algorithm implementation in the ROS.
One part of the project is to build a robot model using URDF, test it in Gazebo and another is to configure localization stack using AMCL package.

Robot Model, with a laser scan and camera sensors
Current and future projects are teaching us to deal with dozens of parameters that you need to tune to make your system work. Robot model parameters – inertial, visual, collision; AMCL parameters – particles number, velocities limits, transform tolerance, odometry characteristics; Move Base parameters – inflation radius, robot footprint, local & global cost map settings, planner settings and so on …
Sometimes it’s converging quickly, and you have a working robot, but sometimes it’s not, and you are moving circles making a lot of tweaks and tests launching ROS, RViz, and Gazebo many times.
My custom robot executing localization and navigation to the goal
Here are links to my implementation of the project on GitHub and a write-up in PDF.
Related links:
- Thrun, Sebastian, et al. “Robust Monte Carlo localization for mobile robots.” (2001).
- Thrun, Sebastian, Wolfram Burgard, and Dieter Fox. Probabilistic robotics. MIT press, 2005.
Project 2.3: Map My World Robot
It’s a SLAM project where we’ve explored different approaches to SLAM during the lessons: Full SLAM vs. Online SLAM, FastSLAM (EKF-based and Grid-based), GraphSLAM.
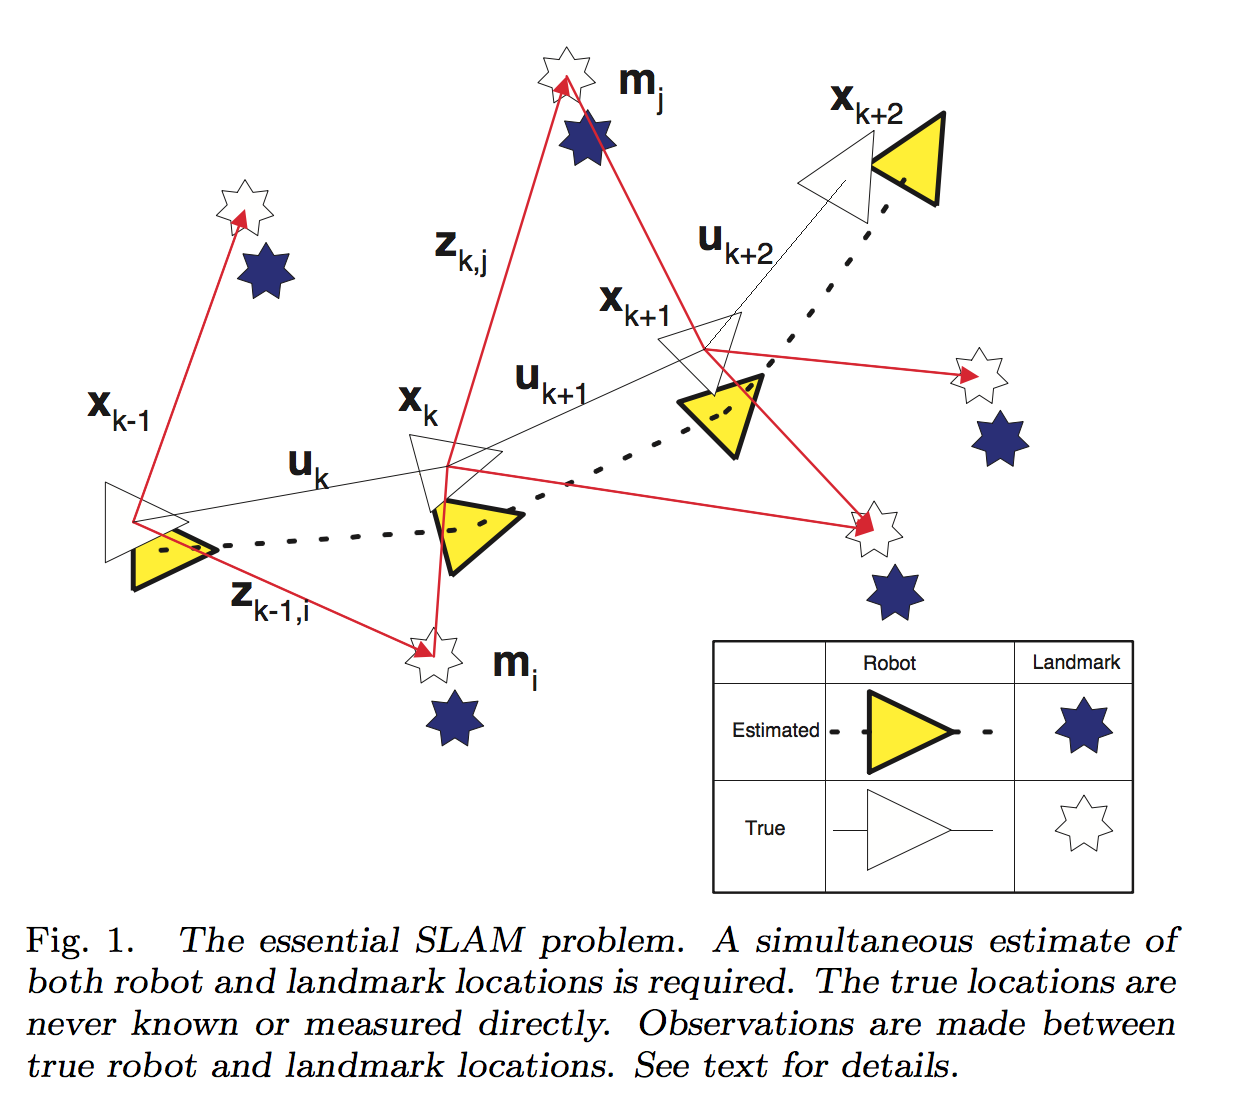 Durrant-Whyte et al. (2006)
We’ve used the mapping capabilities of rtabmap to map the environment using the previously build URDF robot model with a newly equipped depth camera and necessary configurations.
We’ve built the map of the provided environment and explored loop closure on the resulting map. Then we’ve modeled our environment in Gazebo and built the map for it with our configured robot using rtabmap implementation.
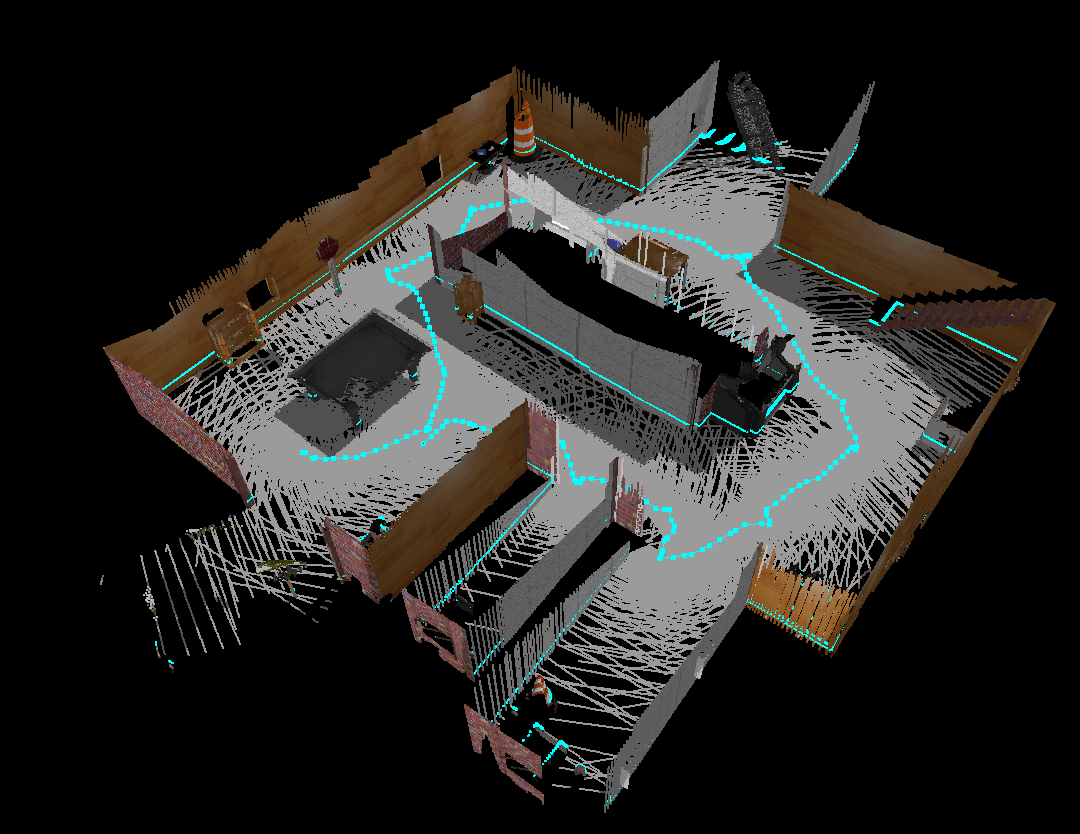
3D map of custom environment. Built with rtabmap.
SLAM is very complex problem algorithmically and computationally, and it’s worth exploring it deeper because you can find it everywhere from AR/MR/VR headsets, controllers, mobile phones to self-driving cars and Mars rovers.
Here are links to my implementation of the project on GitHub and a write-up in PDF.
Related links:
- Real-Time Appearance-Based Mapping
- Durrant-Whyte, Hugh, and Tim Bailey. “Simultaneous localization and mapping: part I.” (2006).
- Bailey, Tim, and Hugh Durrant-Whyte. “Simultaneous localization and mapping (SLAM): Part II.” (2006).
- Grisetti, Giorgio, et al. “A tutorial on graph-based SLAM.” (2010).
Project 2.4: Deep RL Arm Manipulation
Deep Reinforcement Learning is the next big thing in deep learning, and you’ve probably heard about DeepMind, AlphaGo Zero or Open AI agent that plays Dota 2 tournaments against humans. This project is about an application of deep reinforcement learning to robotic tasks.
Objectives of the project were to create a DQN Agent and tune hyperparameters to achieve the two following tasks:
- Any part of the robot arm should touch the object with at least an accuracy of 90%.
- Only the gripper base of the robot arm should touch the object with at least an accuracy of 80%.
Project environment was built on ROS and Pytorch LSTM Network with C++ integrations to Gazebo plugin.
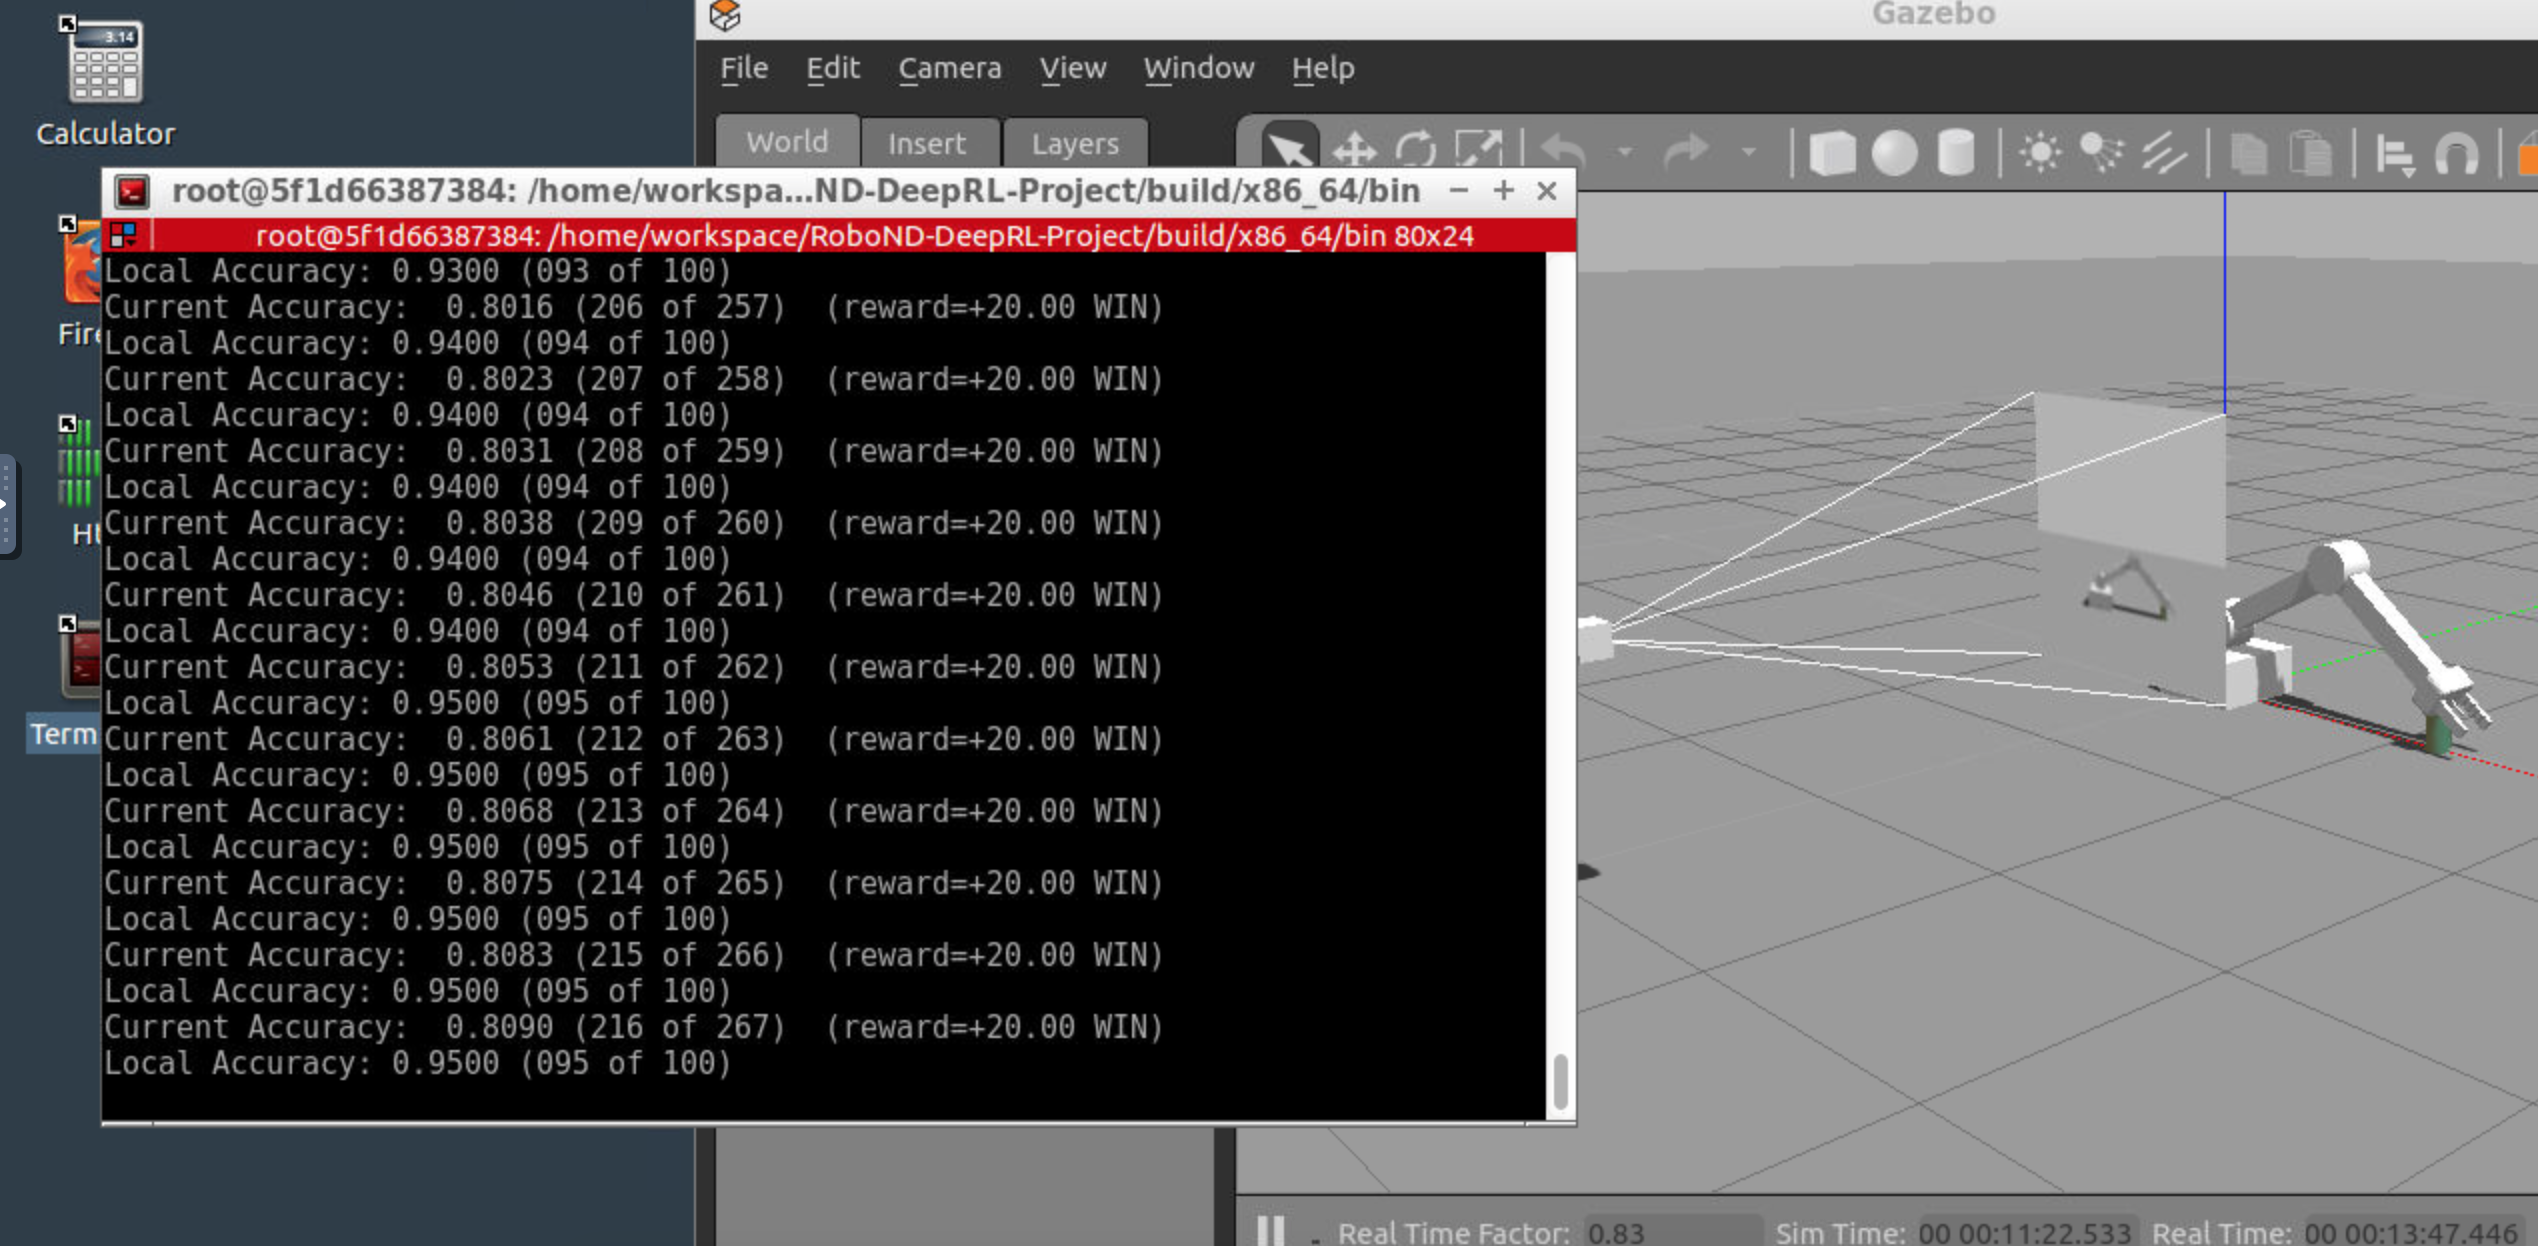 Deep RL Arm Manipulator trained for Task #2
The main difficulty in the project was to select the good reward function that would be able to learn the expected behaviors. I’ve spent more than 20 hours of GPU’s compute time on Udacity Workspace on just training and testing different reward params.
Links to my implementation of the project on GitHub and a write-up in PDF.
Relevant materials & links:
- David Silver Reinforcement Learning Lectures
- Dustin Franklin, Jetson TX2, Reinforcement Learning repo
- Open AI: Dota 2
- “Reinforcement Learning: An Introduction”, Richard S. Sutton and Andrew G. Barto, 2018
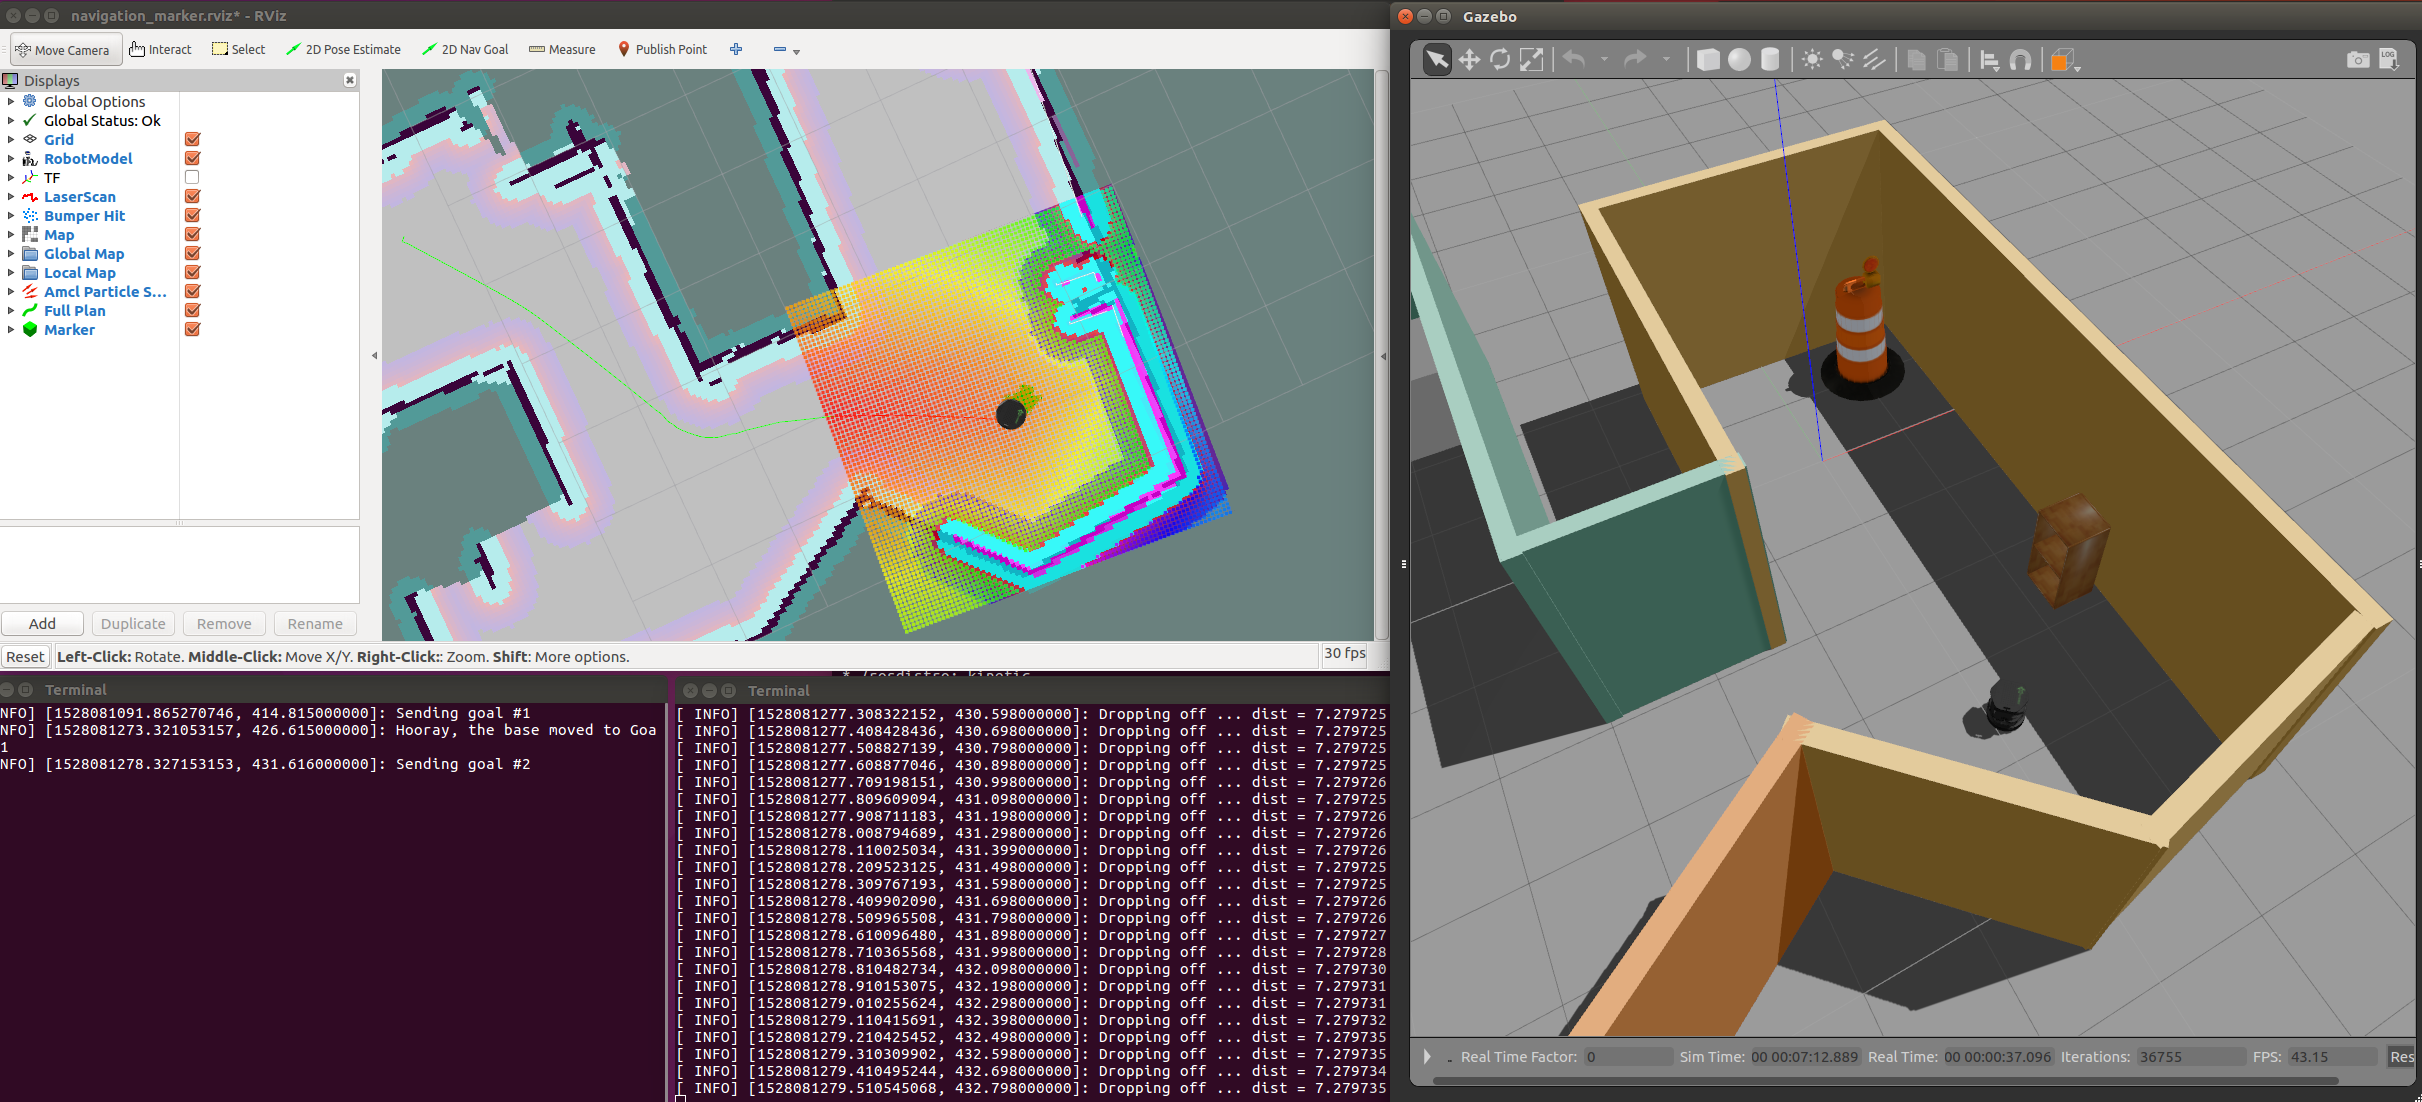
Project 2.5: Home Service Robot
Finally, I am returning to the project that was mentioned at the beginning of the article.
It’s an integration project to build the structure of home service robot that can build a map by executing a wall follower algorithm, navigate to the pick-up location, collect an object, navigate to the drop-off location and leave the object there.
Home Service Robot completing Goal #1
Main challenges were to integrate everything in the ROS using and re-using packages from Turtlebot while implementing three custom nodes:
- Add Markers
- Pick Objects
- Wall Follower
Here the links to my implementation of the project on GitHub.
Relevant materials & links:
Future work
That was a great journey through the vast amount of information and tools. I’ve tried to break the ice of ROS and Gazebo myself 2 years ago but lost motivation without the task at hand and well-defined structure.
I think the primary value that you get from Udacity’s Nanodegree is the organized and straightforward success path for learning, projects tasks and environments that you can start playing with and community of like-minded people who are passionate about robotics and going through the challenges together with you.
My future work in the field would be:
- Explore how one can make a higher order robotics sensor using open source and cheap hardware like Google Vision kit which has integrated Vision Bonnet board with Intel Movidius chipset – the great candidate for on the edge deep learning based processing.
- Build a 1/10 self-driving car model using Jetson TX2 + RC model and implement the navigation stack with some useful utility for a household.
Happy learning and building autonomous robots.
PS: If you are in San Francisco - Bay Area, building robots or want to collaborate on some robotics/self-driving car projects I would be happy to chat with you.